How to Post a Video on Canvas: 2026 Guide for Uploads, Studio & AI

Posting a video on Canvas can be done in three main ways: upload a video to Canvas with the Rich Content Editor, embed a video from Canvas Studio, Panopto, YouTube, Vimeo, or Kaltura, or submit the video through a Canvas assignment or discussion.
For short videos, direct upload is usually the fastest method; for large, long, or reusable course videos, Canvas Studio or an external video platform is usually safer.
But creating the video first is often the hardest part. If your course content still lives in PDFs, slides, docs, or scripts, Leadde can help you save PowerPoint as video files and turn it into a professional business video automatically in minutes—helping teams reduce overall video production costs by over 80% and save 90% of content creation time.

How to Post a Video on Canvas: 3 Quick Methods
td {white-space:nowrap;border:0.5pt solid #dee0e3;font-size:10pt;font-style:normal;font-weight:normal;vertical-align:middle;word-break:normal;word-wrap:normal;}
| Video Posting Method | Best Use Case | Maximum File Size / Length Limit | Canvas Storage Impact |
| Native RCE Upload | Short instructional clips, single-use videos, or brief assignments. | Strict 500 MB limit | High (Rapidly drains course quota) |
| Direct Canvas Record | Quick webcam announcements, weekly check-ins, or discussion replies. | N/A (Limited by browser cache/time) | Low to Medium |
| External Embed (YouTube/Panopto/Studio) | Heavy lecture recordings, high-definition (HD) materials, and reusable modules. | Unrestricted (Depends on external host) | Zero Impact |
Method 1: Upload a Local Video File with the Rich Content Editor
The Rich Content Editor (RCE) is the primary tool used to add media anywhere in Canvas, including Pages, Announcements, and Assignments.
To upload a local video file from your computer:
- Open the specific Canvas item and click the Edit button.
- Click the Media icon (represented by a small play button and musical note) on the RCE toolbar, or navigate to Insert > Media > Upload/Record Media.
- Ensure the Computer tab is active in the popup window.
- Drag and drop your video file into the box, or click the box to browse your local storage.
- Type an accessible title in the Title field, then click Submit to insert the video player directly into the text editor.
Method 2: Record a Video Directly in Canvas
Canvas allows both instructors and students to capture webcam footage or microphone audio on the fly without using external recording software.
To capture native media via the RCE:
- Launch the Upload/Record Media window within the RCE.
- Switch from the default computer tab to the Record tab at the top.
- Grant your browser permission to access your microphone and camera.
- Click Mic or Webcam to modify your inputs, or choose No Video for pure audio logs.
- Press Start Recording, complete your spoken delivery, and click Finish.
- Preview your media, name the file, and click Save to place it into the RCE.
Note: The native recording tool requires a modern browser. Safari does not support direct video recording within Canvas. Use Google Chrome or Mozilla Firefox to prevent freeze errors.
Method 3: Embed a YouTube, Vimeo, Panopto, or External Video Link
Embedding external streaming links is the most efficient way to keep your Canvas environment lightweight and performing fast.
To embed a web video securely:
- Copy the target URL or the exact HTML embed code ($$\text{
- In the Canvas RCE, click the Embed icon (represented by cloud brackets
</>) or choose Insert > Embed. - Paste the embed code directly into the provided text window and click Submit.
- Alternatively, simply paste a standard YouTube URL into the editor; Canvas will automatically parse the link into an interactive player upon saving.
Which Method Should Students or Instructors Choose?
Selecting the proper method depends entirely on the file size, video purpose, and technical setup of your target audience.
- Native Uploads (Method 1): Ideal for non-reusable, short explanatory video elements under 5 minutes.
- Direct Recording (Method 2): Best for quick introductory announcements, weekly check-ins, or casual discussion board updates.
- External Embedding (Method 3): Mandatory for major lecture materials, recurring training modules, or high-definition files that exceed storage limits.
What Are the Canvas Video Upload Limits?
What Is the 500 MB Canvas Upload Limit?
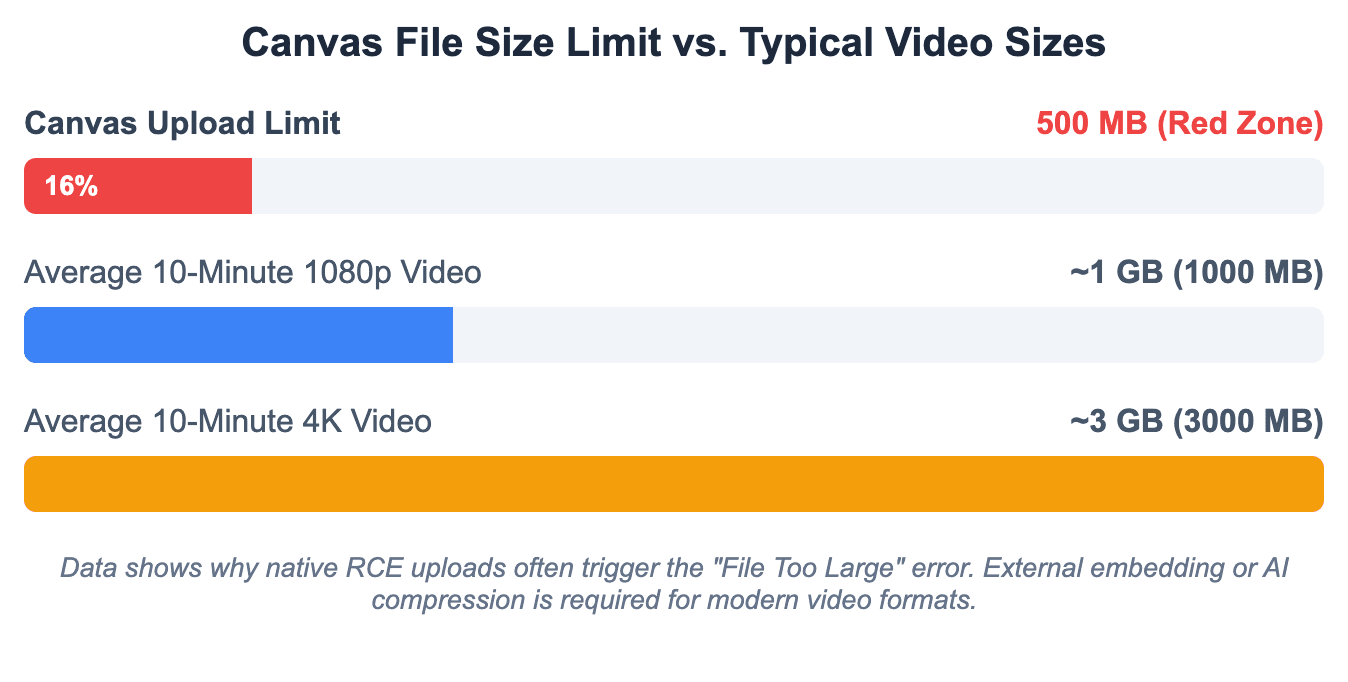
Canvas enforces a strict 500 MB maximum size limit per file for any media processed directly through the native RCE upload interface.
- This threshold applies to both student assignment uploads and instructor course creations.
- Any file exceeding 500 MB will trigger an immediate system rejection or fail during the post-upload processing phase.
- This limit is a fixed architecture restriction and cannot be bypassed by changing course-level administrative configurations.
Why Large Videos Should Not Be Uploaded Directly to Course Files
Every individual course shell inside Canvas contains a restricted total storage quota, often set between 1 GB and 2 GB depending on institutional policies.
- Uploading raw video assets directly to the Files directory consumes this infrastructure quota immediately.
- Once a course quota is exhausted, instructors can no longer add text assets, PDFs, or basic quizzes.
- Directly uploaded file structures do not stream smoothly; they force student browsers to download massive data blocks before playback can begin.
How to Fix the “File Too Large” Error
When facing a "File Too Large" notification, you must change how the file data is handled before attempting another Canvas upload.
- Compress the Media Asset: Use optimization utilities like HandBrake or online image-video compressors to reduce raw bitrates.
- Lower the Resolution: Downscale your source video from 4K or 1080p to a highly readable 720p output.
- Pivot to Third-Party Hosting: Move the video out of local storage and host it on an LTI-integrated cloud repository instead.
How to Handle iPhone MOV Upload Issues
Videos recorded on modern iPhones use the high-efficiency .MOV container format, which often causes playback failures within Canvas media players.
- The raw Apple codec causes the Canvas player to display a black screen or experience infinite rendering freezes on Windows-based student computers.
- The Fix: Instructors and students should adjust their iOS camera settings to Most Compatible before recording, or use desktop conversion tools to transcode
.MOVfiles into standard.MP4format before uploading.
When Should You Use Canvas Studio, Panopto, Kaltura, YouTube, or Vimeo Instead?
If your media asset fulfills any of the following conditions, you must skip native RCE uploads and deploy an external video infrastructure:
- The raw file duration exceeds 15 minutes or the total size is larger than 500 MB.
- You require detailed viewer analytics to monitor student completion percentages.
- The video content needs to be shared across multiple section modules or reused in subsequent academic semesters.
- You require advanced auto-captioning to meet strict modern accessibility guidelines.
How Do You Post a Video in a Canvas Discussion or Assignment?
| Submission Type | Instructor Setup Requirement | Student Action Path |
| File Upload | Must enable "Media Recordings" | Upload .MP4 directly from local drive |
| Text Entry | Must enable "Text Entry" | Click Apps icon -> Select Canvas Studio |
| Website URL | Must enable "Website URL" | Paste public Google Drive / YouTube link |
How to Add a Video to a Canvas Discussion Reply
Discussion boards thrive on multimedia presence. Students and instructors can easily enrich communication by dropping video blocks into standard forum threads.
- Navigate to the discussion prompt and click the Reply button to open the editor.
- Locate the RCE toolbar, select the media framework icon, and attach your compressed file.
- Type your supplementary text responses around the video box to ensure contextual clarity.
- Click Post Reply to publish the entry to the open class forum.
How to Use Canvas Studio in a Discussion Reply
For a much cleaner forum interface, leverage the advanced Canvas Studio app integration directly inside your open text response.
- Inside the discussion reply box, click the Apps icon (represented by an electrical plug icon) or select the specific blue Canvas Studio shortcut button.
- Select the precise video asset from your pre-loaded cloud library window.
- Crucial Formatting Tip: Always toggle OFF the "Display Media Tabs" feature before inserting. This hides messy comment blocks and prevents long, cluttered discussion boards.
- Click Embed to securely publish the polished streaming block.
How to Submit a Video File or Studio Video as an Assignment
When an assignment requires a video presentation submission, students can upload their finalized work via multiple entry pathways depending on teacher instructions.
- Click Start Assignment within the specific module page.
- If the teacher selected File Upload, browse your system and select the compatible
.MP4file (ensuring it is under 500 MB). - If Text Entry is active, open the RCE, activate the Canvas Studio plug-in, select your completed presentation, and press submit.
- Review your submission confirmation details to guarantee the asset uploaded correctly before the closing deadline.
Should You Upload a File, Submit a Studio Video, or Paste a Link?
- Submit a Studio Video: This is always the premium choice for students. It guarantees zero file compatibility problems and ensures teachers can stream the footage immediately during grading.
- Upload a File: Use this path only if Canvas Studio is unavailable and your final asset size is exceptionally small.
- Paste a Link: Use this method when managing massive video presentations stored in safe clouds like Google Drive or OneDrive.
What Should Students Do If an Upload Fails Before the Deadline?
LMS upload queues often stall during peak submission windows right before assignments lock up.
- Take Immediately Verifiable Screenshots: Capture the entire desktop interface displaying the time stamp and the Canvas error code box.
- Deploy an Emergency Cloud Backup Link: Upload the presentation file immediately to OneDrive or Dropbox, and paste that sharing link as a standard text entry submission.
- Alert the Instructor: Email the link alongside the technical screenshot proof directly to your teacher to request an extension before the deadline closes.
How Do You Add a Video to a Canvas Page or Module?
| Canvas Action | Student Visibility | Notifications Sent | Editing Implications |
| Save (Draft) | Hidden (Instructors Only) | None | Safe to edit video embeds without confusing active students. |
| Save & Publish | Live (Visible to All) | Yes (If course is fully active) | Making changes to live videos may disrupt student playback. |
How to Add a Video to a Canvas Page
Instructors frequently assemble central course content spaces using Canvas Pages to host permanent informational and lecture assets.
- Go to Pages in the course navigation panel and click + Page.
- Add a distinct title (e.g., Week 1 Lecture Video).
- Use the RCE menu framework to embed your target video asset via local upload or external LTI connection.
- Position the player centrally on the page, add descriptive paragraphs below it, and click Save.
How to Add a Video Inside a Canvas Module
Modules provide the structural roadmap of your course layout. You can feature videos directly inside these paths for structured consumption.
- Navigate to Modules and locate your current instructional week block.
- Click the + (plus) icon located on the right side of the module header.
- Drop down the selection menu and choose Page (recommended) or External Tool if linking directly to a service like Panopto.
- Select your pre-created video page from the list and click Add Item.
What Is the Difference Between Save and Save & Publish?
- Save: Stores your newly configured video layouts securely inside the system back-end. However, the asset remains completely hidden from all enrolled students.
- Save & Publish: Commits the updates to the server and instantly pushes the video live onto the active student dashboard timelines.
How to Check Whether Students Can See the Video
Never assume an asset is perfectly visible simply because it renders fine on an instructor account.
- Navigate back to the course home page view.
- Click the Student View button (represented by a prominent glasses icon in the upper-right corner).
- Navigate through the modules exactly like an active student to confirm the video element displays and plays without permission faults.
How Many Videos Should You Place on One Page?
As of 2026, educational user experience statistics show that overloading single digital web pages degrades student focus and strains mobile network speeds.
- The Golden Rule: Limit your distribution to a maximum of 2 videos per Page.
- If a specific syllabus module requires 4 video segments, split the delivery across two distinct pages (e.g., Part A and Part B) to keep learning loops organized and highly scannable.
How Do You Use Canvas Studio, Panopto, or External Video Tools?

When Should You Use Canvas Studio Instead of Course Files?
Canvas Studio is an elite cloud-hosted video management tool that operates independently from standard course storage restrictions.
- Zero Storage Drag: Studio files do not count toward your restrictive course file limits.
- Interactive Learning Loops: It allows instructors to append targeted quiz markers directly into the timeline.
- Deep Insight Tracking: Instructors can view precise, real-time engagement graphs showing who watched or skipped specific topics.
How to Upload or Record a Video in Canvas Studio
- Click the global Canvas Studio icon located on the far-left global navigation panel.
- To upload external assets, click the Add button in the top right, then drag your desktop files or drop a public YouTube URL.
- To capture fresh material, click Record and choose between Screen Capture or Webcam Capture to deploy the native recording utility app.
How to Embed a Studio or Panopto Video in Canvas
- Launch your target Page editor and access the RCE toolbar.
- Click the plug-shaped Apps button and select Canvas Studio or Panopto Video from your institutional dropdown menu.
- Browse your centralized media library dashboard and highlight the desired clip.
- Configure your interactive settings (such as hiding media tabs or adding quiz overlays) and click Insert.
How to Embed a YouTube, Vimeo, Kaltura, or External Video
- Acquire the direct sharing link or HTML frame data from your external web host dashboard.
- Inside Canvas RCE, click Insert > Embed to open the raw code window.
- Paste the embed script, hit submit, and verify that the video box snaps cleanly into the rich text layout area.
How to Avoid Permission Errors with External Videos?
Students frequently encounter generic "Access Denied" or "Private Video" black boxes when attempting to play external embeds.
- YouTube Settings: Ensure the source video privacy configuration is set to either Public or Unlisted. Never set it to Private.
- Google Drive / OneDrive Rules: Modify the original link permission settings to "Anyone with the link can view" before deploying the embed data inside Canvas.
Why Won’t My Canvas Video Upload or Play?
| Video Playback Symptom | Likely Diagnostic | Action Required |
| Black Box / Access Denied | External URL privacy settings are strict | Change YouTube link to "Unlisted" or "Public" |
| "Processing Media" loop | Canvas server is encoding the file | Wait 10-15 minutes; do NOT delete the file |
| Teacher sees it, Student doesn't | Module or Page is unpublished | Click "Publish" (Green Checkmark) on the Module |
Is the Video File Too Large?
If an asset upload progress bar continuously loops or crashes near completion, your file footprint is likely hitting systemic blocks.
- Confirm the file is strictly below the 500 MB single-file ceiling.
- If it is slightly over, run the raw footage through desktop compression tools before trying again.
Is Your Browser or Internet Connection Causing the Problem?
Unstable local network connections or missing browser updates routinely break active Canvas media streaming connections.
- Clear your browser's cache and cookies to remove outdated session conflict blocks.
- Turn off all aggressive ad-blocking or script-protecting extensions that might prevent Canvas player scripts from initializing.
Why Students May Not Be Able to See the Video
If your personal teacher account previews the media fine but students report blank sections, check these operational parameters:
- The parent Module housing the video page is currently Unpublished (marked by a grey slashed circle).
- The video asset is stored inside a locked Files folder that has been hidden from student visibility settings.
How to Test the Video with Student View
Always perform a validation run using the integrated Student View tool before launching a week's curriculum. If the video loops indefinitely or requests a secondary login screen under Student View, your permissions are misconfigured.
What to Do If the Video Is Still Processing
Large native uploads require time on the backend cloud servers to encode into web-ready formats.
- If a video player shows a "Processing Media" placeholder box, do not delete or re-upload the file.
- Allow up to 10–15 minutes for complex files to finish rendering on the server architecture.
2026 Trend: How Can You Create Canvas-Ready Videos Faster with AI?
Why Traditional Video Production Slows Down LMS Educators
Traditional instructional video production is notoriously slow and resource-intensive:
- Instructors often spend days writing scripts, setting up studio lighting, recording multiple takes, and editing massive raw video files.
- This slow turnaround time makes it difficult for corporate L&D teams and university departments to update courses quickly when industry standards change().
- The large raw files generated by this process frequently cause storage quota errors when uploaded directly to Canvas platforms.
How to Turn PDFs, PPTs, Word Docs, or Scripts into Videos
Modern generative AI completely redefines how educational content is produced:
- Instead of recording footage manually, educators can feed existing lecture notes, onboarding documents, or presentation slides directly into an AI video generator. For example, they can easily create informational videos from documents or learn how to turn a PPT into an eLearning video structure. .
- The AI system automatically parses the text structure, maps out logical scene layouts, and generates high-definition video files featuring life-like digital presenters().
How Leadde Helps Create Canvas-Ready Videos from Existing Course Materials
Leadde provides a streamlined solution tailored specifically for modern LMS content deployment():
- Automatic Document-to-Video conversion allows creators to turn text, PDFs, or slides into videos effortlessly while maintaining clean corporate branding layouts().
- The platform generates lightweight, web-optimized video files that stream perfectly inside Canvas without hitting the strict 500 MB file limit.
- With starter plans priced at just $19 per month for unlimited video creation, it offers a highly scalable alternative to traditional video production setups().
How AI Avatars and Multilingual Video Workflows Support Training and Education
Using advanced AI avatars dramatically expands the reach and impact of online learning platforms:
- Global Multilingual Reach: Leadde supports 170+ languages with diverse localized accents, allowing enterprise training managers to adapt an English course module for global teams instantly().
- Interactive Engagement Loops: Unlike older, one-way video platforms, Leadde utilizes the best AI avatar creators for e-learning and interactive tutorials, offering chat-enabled interactive avatars that facilitate two-way conversational learning inside modern training environments. Instructors can master how to create an interactive avatar for better visual feedback.
- Custom Persona Design: Instructors can easily create a custom avatar from a simple photo and pair it with voice cloning to build a consistent, recognizable digital teaching persona().
Final Decision Table: RCE Upload vs Canvas Studio vs Panopto vs YouTube vs Leadde
| Feature/Dimension | Native RCE Upload | Canvas Studio | Panopto Video | YouTube Embed | Leadde AI Video |
| Storage Quota Cost | High (Drains Course Quota) | Zero (Cloud Hosted) | Zero (Cloud Hosted) | Zero (External Host) | Zero (External Cloud Host) |
| File Size Limit | Strict 500 MB Restriction | Generous Cloud Space | Institutional Limits | Unrestricted Space | Unrestricted (Web Optimized) |
| Creation Method | Manual Local Record | Manual Capture Tools | Desktop Screen Record | Traditional Video Kit | Auto Document-to-Video AI |
| Viewer Analytics | None (Basic Download Count) | Detailed Retention Graphs | Deep Engagement Matrix | Public Counts Only | Advanced Engagement Loops |
| Language Support | Single English Track | Manual Caption Tracks | Auto Captioning Only | Auto Subtitles Only | 170+ Dialects + Voice Clone |
| Interactivity | One-Way Static Output | In-Video Comment Feeds | Basic Notes Sections | Standard Comment Board | Chat-Enabled Active Avatars |
Conclusion
Posting a video on Canvas effectively requires balancing file constraints, platform capabilities, and student accessibility. For short announcements, native RCE tools work well, while Canvas Studio or Panopto are ideal for larger files. To scale video production, modern AI platforms like Leadde allow corporate trainers and educators to convert documents into lightweight, multilingual, and interactive video modules instantly(). This modern workflow saves up to 90% of creation time and ensures seamless delivery on any device().