
How Are People Making Realistic AI Videos in 2026? Real Workflows, Tools, and Mistakes to Avoid

People are making realistic AI videos by combining short AI-generated clips, reference images, image-to-video models, video upscaling, editing, sound design, and color grading. The most realistic AI videos are usually not made from one perfect prompt. They are built through a repeatable production workflow: plan the scene, create or collect reference images, generate multiple short clips, choose the cleanest outputs, stitch them together, add voice or music, upscale the footage, and polish the final video.
The biggest difference between beginner AI videos and realistic AI videos is not only the tool. It is the workflow.
In my user research and production analysis, the same pattern appeared again and again: realistic AI video creators rarely depend on a single generator. They often use tools such as Kling, Runway, Luma, Veo, Midjourney, Topaz, ComfyUI, local video models, voice tools, music tools, and editing software together. One tool may generate the first clip. Another may extend it. Another may create music. Another may upscale the final footage. The final realism comes from the whole pipeline, not one button.
This guide breaks down how people are actually making realistic AI videos, why most creators work with short clips, which tools fit different use cases, what still makes AI videos look fake, and how to build a practical workflow for social videos, ads, short films, avatars, and educational content.
For teams that want a more structured way to turn scripts, documents, slides, or training materials into professional AI videos, Leadde provides an AI video creation workflow that helps convert existing content into polished videos without starting from a blank prompt.

Why Realistic AI Videos Are Usually Made as Short Clips, Not One Long Video
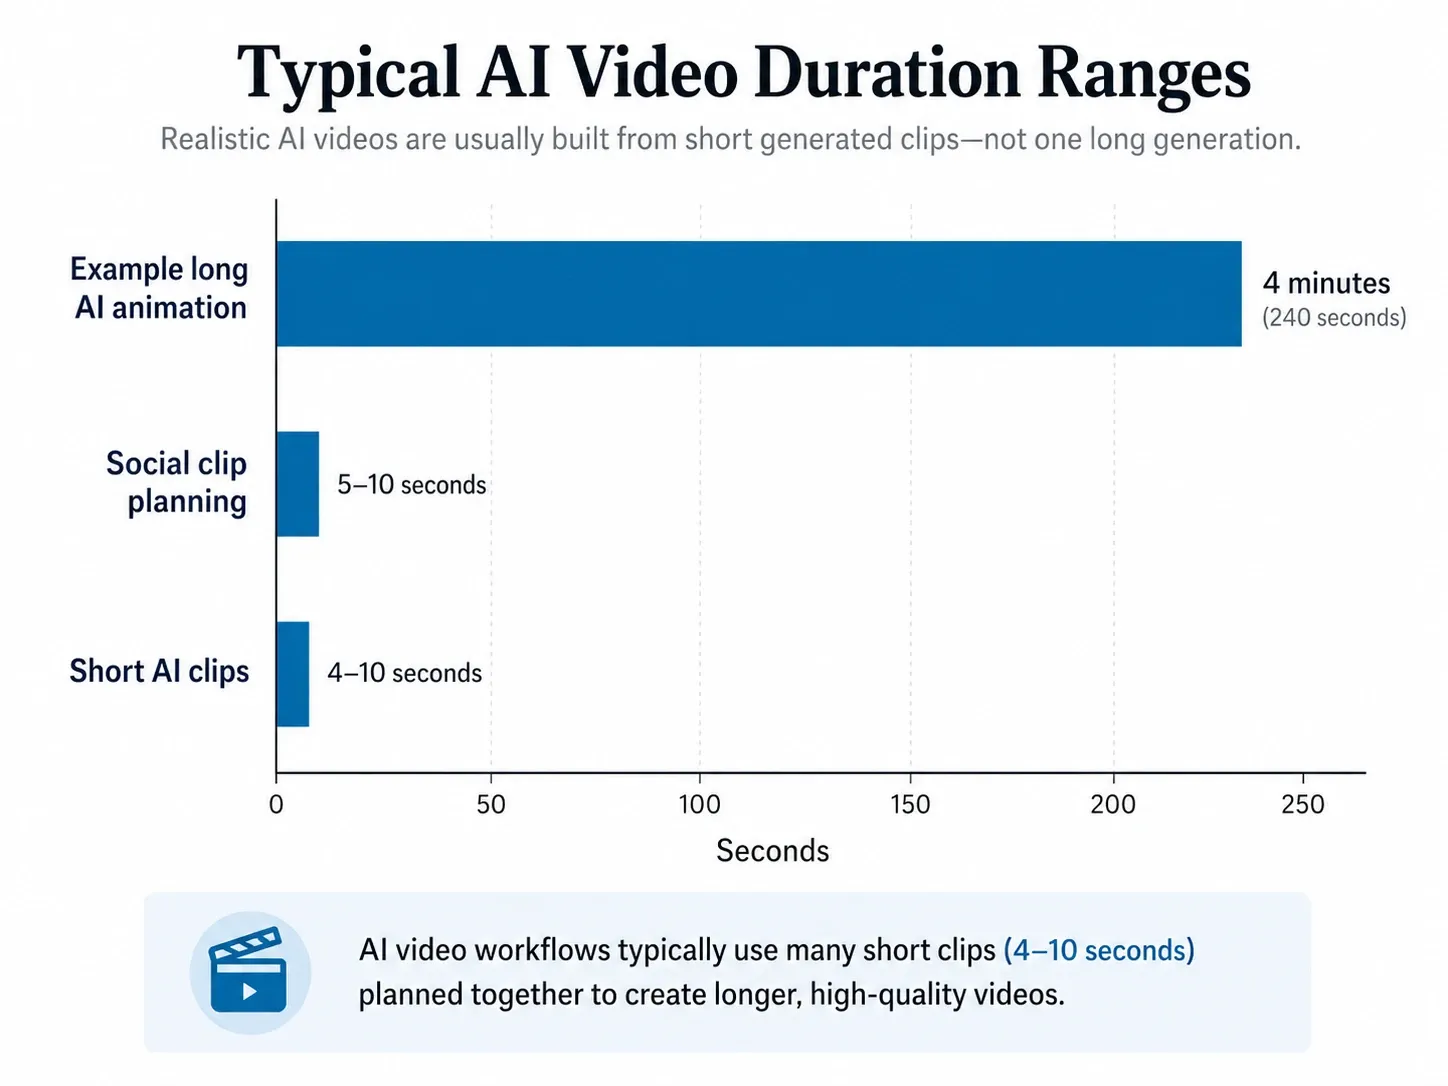
Most realistic AI videos are made from short clips because current AI video models are still better at generating small controlled moments than long continuous scenes. In real production workflows, a creator usually generates many 4–10 second clips, selects the best ones, and then edits them into a complete video.
This is one of the most important things beginners misunderstand.
A polished AI video may look like one smooth final piece, but behind the scenes it is often a sequence of short generated shots. Each shot is tested, rejected, regenerated, trimmed, stitched, and polished. The final video feels seamless because of planning and editing, not because the model generated the entire thing perfectly in one pass.
Current AI Video Models Work Best in Short Segments
Short clips are easier to control because the model only needs to maintain the same face, body, background, lighting, and motion for a few seconds. Once a clip becomes longer, the chance of visual drift increases.
Common problems include:
- The character’s face slowly changing.
- Hands or arms becoming distorted.
- The body moving in an unnatural way.
- The camera drifting without purpose.
- Clothing or background details changing between frames.
- The subject looking realistic at the start but strange by the end.
That is why many realistic AI video creators treat AI video generation more like shot production than traditional recording. They do not ask the model to make the whole film. They ask it to create one usable shot at a time.
A practical realistic AI video workflow often looks like this:
Scene idea
→ Reference image
→ 4–10 second AI video clip
→ Regenerate several versions
→ Select the cleanest output
→ Repeat for the next scene
→ Edit clips together
→ Add voice, music, sound effects, subtitles
→ Upscale and color grade
→ Publish
Why Long AI Videos Require Re-Generation and Editing
Longer AI videos require more re-generation because every clip has a failure risk. In my research, creators making serious AI video projects often had to generate the same short clip multiple times before getting a clean result.
One Veo 3 demo case showed how quickly this becomes a production issue. The creator had access to 1,000 credits, with each generation costing 100 credits. In theory, that allowed about 10 generations. To finish a small demo, they used two education accounts and generated around 20 attempts to produce 5 usable clips. Two clips worked on the first try, while the other three required 3–6 generations each.
That example shows a hidden truth about realistic AI video production: the real cost is not just the subscription. The real cost is failed attempts.
A 5-second clip may look simple, but if it takes five generations to get one clean result, the time and credit cost multiply quickly. For a 30-second video with six shots, that could mean dozens of generations. For a 4-minute AI animation, it can mean hundreds of tests.
The Real Workflow: Generate, Select, Stitch, Polish
The best AI video creators usually do not try to force a model to do everything. They use a production mindset:
- Generate many short options.
- Select the clips with the fewest visual problems.
- Stitch them together in an editor.
- Hide weak frames with cuts, subtitles, sound, or transitions.
- Add final polish so the video feels like real footage.
This is why realistic AI videos are not only a prompting skill. They are also an editing skill.
If your AI videos still look fake, the problem may not be your prompt. It may be that you are expecting the model to do the work that should happen in editing, sound design, and post-production.
The Realistic AI Video Workflow Most Creators Use
The most reliable way to make realistic AI videos is to use a multi-step workflow instead of depending on a single text prompt. The workflow below is based on patterns I found across real creator projects, tool testing, and practical production examples.
Step 1: Start With a Scene Plan, Not Just a Prompt
A realistic AI video should start with a scene plan. A prompt alone is not enough.
Many beginners write long prompts filled with camera terms, lighting descriptions, and style words. That can help, but it does not solve the core problem: the model needs a clear and simple action to generate.
Before writing a prompt, define:
- Who or what is the main subject?
- What is the subject doing?
- How long should the clip be?
- Is the camera static or moving?
- What should stay consistent?
- What should change during the shot?
- Does this clip connect to another clip?
For example, instead of asking for:
“A cinematic realistic man walking through a futuristic city with dramatic lighting, emotional atmosphere, detailed skin, dynamic camera, realistic motion, 4K, ultra-realistic.”
A stronger production prompt would focus on one controlled action:
“A realistic close-up shot of a tired man walking slowly through a rainy city street at night. The camera tracks beside him. Wet pavement reflects neon lights. His face stays consistent, his expression is serious, and the movement is natural.”
The second prompt is better because it gives the model one subject, one action, one camera movement, and one environment.
For realistic AI videos, each clip should do one clear job.
Step 2: Create or Choose Strong Reference Images
Reference images are one of the most important parts of making realistic AI videos. If you want consistent characters, products, animals, or environments, image-to-video is often more controllable than text-to-video.
A strong reference image should have:
- One clear main subject.
- Clean lighting.
- Minimal background distractions.
- A readable face or product shape.
- A pose that matches the intended motion.
- A style close to the final video look.
If the reference image is too crowded, the model may struggle. Full-body shots, complex costumes, busy backgrounds, multiple people, and unclear lighting can all increase the chance of distortion.
For people and avatars, clean face references matter. For product videos, the product shape should be clear. For animals, the body position should not be too complex. For cinematic scenes, the lighting and camera angle in the reference image should already feel close to the desired final shot.
This is why tools like Midjourney are often used at the beginning of the workflow. They are useful for creating characters, locations, mood boards, background assets, and visual style references before the video generation step begins.
Step 3: Use Image-to-Video for Consistency
If your goal is realism, image-to-video usually gives you more control than text-to-video.
Text-to-video is useful for fast experiments, abstract scenes, surreal visuals, and ideas where the exact subject does not need to stay the same. But if you need a realistic person, product, animal, room, vehicle, or brand asset to remain consistent, image-to-video is usually the safer workflow.
Use text-to-video when:
- You are exploring rough ideas.
- You do not need the same character across shots.
- The scene is abstract, fantasy, or surreal.
- Speed matters more than control.
Use image-to-video when:
- You need a consistent person or product.
- You want a realistic social media clip.
- You are creating an ad or UGC-style video.
- You want to preserve lighting, framing, or identity.
- You need to connect multiple shots.
Use multi-reference or local workflows when:
- You are making a short film.
- You need recurring characters.
- You want stronger identity control.
- You are comfortable with ComfyUI or local model workflows.
- You need more technical control than consumer tools provide.
Step 4: Generate Multiple Short Clips and Keep Only the Clean Ones
Realistic AI video production is a selection process. You should expect to generate more versions than you use.
When reviewing generated clips, look for:
- Face stability.
- Natural body movement.
- Clean hands and arms.
- Consistent clothing.
- Stable lighting.
- Realistic camera movement.
- No strange object morphing.
- No sudden background changes.
- No visible glitch in the first or last frame.
A good rule is simple: do not try to fix every bad clip. Generate more options and choose the cleanest one.
In many cases, the fastest way to improve realism is not to write a longer prompt. It is to reject weak outputs faster.
Step 5: Edit Clips Into a Story
The most realistic AI videos are not just beautiful clips. They have structure.
In my analysis of AI video accounts and creator workflows, strong videos usually had a clear idea, hook, and sequence. The visual quality mattered, but the script and structure mattered more for audience retention.
A realistic AI video should answer:
- Why should someone watch the first 2 seconds?
- What changes from the beginning to the end?
- Does every clip serve a purpose?
- Is the pacing too slow?
- Are weak frames hidden or removed?
- Does the video feel like a story, ad, demo, or scene?
This is especially important for TikTok, Instagram Reels, YouTube Shorts, and AI ad creatives. A visually impressive video with no idea behind it often feels like a demo. A slightly imperfect video with a strong hook and clear story can perform better.
Step 6: Add Voice, Music, Sound Design, and Subtitles
Sound is a major part of realism. Many AI videos look fake because they feel silent, empty, or disconnected from the scene.
Real videos have texture. They have footsteps, wind, room noise, fabric movement, traffic, background voices, camera handling, breathing, music, and subtle environmental sound.
To make AI videos feel more realistic, add:
- Voiceover.
- Dialogue.
- Lip sync when needed.
- Background music.
- Ambient sound effects.
- Foley-style details.
- Subtitles.
- Natural pauses and pacing.
For AI avatars and talking head videos, the voice often matters as much as the face. A realistic face with robotic audio still feels fake. If you are learning how to create AI avatar videos for employee onboarding, a natural voice, timing, and subtitles can feel more believable.
Step 7: Upscale, Color Grade, and Add Film Grain
Final polish is where many AI videos become publishable.
AI video generators often produce outputs that are visually impressive but not fully finished. The footage may be too smooth, too saturated, too clean, too sharp, or too inconsistent across clips.
Post-production can help fix that.
Common finishing steps include:
- Upscaling the video.
- Increasing frame quality.
- Matching color across clips.
- Reducing over-saturation.
- Adding subtle film grain.
- Adding motion blur when appropriate.
- Adjusting contrast.
- Cleaning up transitions.
- Exporting at the right resolution and bitrate.
Tools like Topaz are commonly used for upscaling and enhancement. But upscaling alone does not create realism. It only improves the final surface quality. The deeper realism still comes from good references, controlled motion, careful selection, editing, sound, and color consistency.
What Tools Are People Using to Make Realistic AI Videos?
There is no single best AI video tool for every realistic video project. The better question is: which tool fits the scene you are trying to make?
Different tools solve different parts of the realistic AI video workflow. Some are better for image generation. Some are better for image-to-video. Some are better for extending clips. Some are better for lip sync. Some are better for upscaling. Some are better for advanced local control.
Kling: Best for Realistic Motion and Coherent Short Clips
Kling is often used for realistic short clips, reference-based motion, slow cinematic scenes, and coherent visual outputs. In practical workflows, it works well when the reference image is clear and the desired action is not too complex.
Kling is especially useful for:
- Realistic short videos.
- Image-to-video generation.
- Cinematic slow motion.
- Surreal but coherent scenes.
- Entertainment clips.
- Remix-style videos based on reference frames.
The limitation is that Kling can still produce warping, especially with full-body shots, complex poses, crowded scenes, or too many visual elements in the reference image. It may also require multiple generations before one clip is clean enough to use.
Best use case: short realistic clips where the scene, subject, and motion are clearly defined.
Runway: Best for Creative Shots, Lip Sync, and Visual Experiments
Runway is useful for creative visual experiments, stylized shots, campaign concepts, music videos, and some lip sync workflows. It is often strong when the goal is not strict realism but visually interesting movement.
Runway is useful for:
- Creative ads.
- Music video scenes.
- Visual experiments.
- AI filmmaking tests.
- Lip sync workflows.
- Mixed-media video projects.
The limitation is that some outputs can feel slow, under-animated, or less physically natural depending on the scene. For realistic action-heavy clips, you may need to test multiple prompts or combine Runway with other tools.
Best use case: creative video production where visual style and flexibility matter.
Luma Dream Machine: Best for Extending Clips
Luma is often useful when the goal is to extend or connect clips. Instead of using it as the only generator, many creators treat it as part of a larger workflow.
Luma is useful for:
- Extending short clips.
- Building visual continuity.
- Connecting scenes.
- Creating dreamlike motion.
- Filling gaps between shots.
The limitation is that free or low-cost usage may be restricted, and not every extension will preserve perfect consistency.
Best use case: extending clips and building smoother visual sequences.
Veo and Veo 3: Best for High-Quality Outputs, But Limited by Credits
Veo is often discussed as a high-quality AI video option, especially when the goal is impressive realism in fewer shots. However, the main practical limitation is credits.
The Veo 3 demo case in my research is a good example. The creator had 1,000 credits, with each generation costing 100 credits. That created a theoretical limit of around 10 generations. To complete 5 usable clips, they ended up using around 20 generations across two education accounts. Two clips worked on the first try, while three required 3–6 generations each.
This shows a key production lesson: high quality does not always mean scalable.
If every failed generation costs credits, creators may become more cautious and less experimental. That can limit creative freedom.
Best use case: high-quality demo clips, cinematic tests, and selected hero shots where fewer final outputs are needed.
Midjourney: Best for Creating Reference Images and Visual Style
Midjourney is not a video generator, but it is often useful at the beginning of a realistic AI video workflow.
It can help create:
- Character concepts.
- Backgrounds.
- Product scenes.
- Mood boards.
- Cinematic frames.
- Visual references.
- Storyboard images.
A strong Midjourney image can become the foundation for an image-to-video clip. This is especially useful when you need a consistent style before sending the image into Kling, Runway, Pika, Luma, or another video tool.
Best use case: creating reference images, visual direction, and consistent style assets.
Topaz: Best for Upscaling and Final Enhancement
Topaz is commonly used at the end of the workflow to upscale footage, improve clarity, and increase perceived production quality.
Topaz is useful for:
- Video upscaling.
- Frame enhancement.
- Sharpening when used carefully.
- Improving final export quality.
- Making clips feel more polished.
But Topaz cannot fix poor motion, broken anatomy, or inconsistent identity. It is a finishing tool, not a realism engine.
Best use case: final polish after you already have clean clips.
ComfyUI, Wan, and Local Models: Best for Advanced Control
Advanced creators often use local workflows when they need more control over identity, references, cost, or customization.
Local workflows can be useful for:
- Character consistency.
- Multi-reference control.
- Local generation.
- Lower marginal generation cost.
- Custom model workflows.
- Experimental pipelines.
- Privacy-sensitive production.
The tradeoff is complexity. You may need to install ComfyUI, download models, configure workflows, manage GPU resources, and learn technical settings.
Best use case: advanced creators who need control more than simplicity.
How to Make AI Videos Look More Realistic
To make AI videos look more realistic, use reference images, keep each clip short, generate multiple versions, hide weak frames with editing, add realistic audio, and polish the final footage with color grading and upscaling.
Realism is not one setting. It is the result of many small production choices.
Use Reference Images Instead of Only Text Prompts
If you want a realistic result, give the model visual information. A text prompt can describe a person, but a reference image shows the model the exact face, lighting, composition, and style you want.
Reference images are especially important for:
- Human faces.
- Product videos.
- Animals.
- Realistic interiors.
- Fashion.
- Food.
- Vehicles.
- Brand characters.
- Short films.
A good reference image reduces randomness. It does not eliminate all errors, but it gives the model a stronger visual anchor.
Keep Each Clip Short and Simple
Short clips are easier to control. Simple actions are easier to generate.
For example:
Better:
- A woman turns and smiles.
- A dog walks across a room.
- A product rotates on a table.
- A car drives through rain.
- A teacher looks at the camera and speaks.
Harder:
- A woman runs, jumps, picks up a bag, turns around, talks, and waves.
- Five people dance in sync.
- A dog jumps over furniture while the camera spins.
- A product transforms while floating through a city.
- A character fights three people in one continuous shot.
If you need a complex action, break it into smaller shots.
Generate More Versions Than You Think You Need
Realistic AI video production requires selection. You should expect failed generations.
For every clip you publish, you may need several attempts. This is normal.
When planning a video, budget for:
- Failed motion.
- Face distortion.
- Bad hands.
- Lighting mismatch.
- Weak camera movement.
- Low-energy outputs.
- Strange background changes.
If your tool uses credits, this matters. A video that looks like it only needs six clips may require 30 or more generations.
Hide AI Weaknesses With Editing
Editing is one of the strongest realism tools.
You can hide AI flaws by:
- Cutting before the error appears.
- Using close-ups instead of full-body shots.
- Adding cutaway shots.
- Using subtitles to guide attention.
- Covering weak motion with sound effects.
- Cutting on action.
- Avoiding long static shots of faces or hands.
- Removing the first or last unstable frames.
Many AI video clips fail only for a few frames. A good edit can save the usable part.
Add Realistic Audio
Audio makes AI video feel alive.
Add sound that matches the scene:
- Footsteps.
- Wind.
- Rain.
- Room tone.
- Traffic.
- Clothing movement.
- Background voices.
- Door sounds.
- Object handling.
- Natural voiceover.
Even simple ambient sound can make a generated clip feel less synthetic.
For social content, subtitles are also important. They improve comprehension, retention, and accessibility.
Polish the Final Video Like Real Footage
Treat the final AI video like real footage in post-production.
Before publishing, check:
- Is the color consistent?
- Is the footage too sharp or too smooth?
- Does the export look compressed?
- Is the audio mixed properly?
- Are subtitles readable?
- Does the video feel like one piece?
- Are there visible glitches in the first or last frame?
Final polish often separates a “cool AI demo” from a realistic video people are willing to watch.
Real Examples of How People Are Making Realistic AI Videos
The best way to understand realistic AI video production is to look at real workflow examples. These cases show the difference between theory and production reality.
Case Study 1: A Local AI Short Film Made With Free and Open-Source Tools
One of the most useful case studies in my research involved a creator making a cinematic short film with local generative AI models and free open-source tools.
The project used tools and models such as:
- Z-Image.
- Klein 9b.
- LTX 2.3 I2V.
- VibeVoice.
- Royalty-free music.
- Original music composition.
The production data was especially useful:
| Production Detail | Data |
|---|---|
| Production time | About 1 week |
| Long workdays | Some days exceeded 12 hours |
| Direct tool cost | $0, excluding electricity and GPU cost |
| Dialogue lines | 36+ |
| Characters | 3 |
| Unique input images | 64+ |
This case shows that realistic AI video can be produced at very low direct cost if you have the technical ability to run local workflows. But it also shows that “free” does not mean effortless.
The creator still needed:
- Scene planning.
- Character consistency.
- Image generation.
- Image-to-video control.
- Dialogue production.
- Music selection.
- Editing.
- Final assembly.
The key insight: local AI workflows can reduce cash cost, but they increase workflow complexity. For technical creators, this can be powerful. For beginners, a simpler hosted tool may be easier.
Case Study 2: A 4-Minute AI Animated Story Made With 500+ Experiments
Another important case involved a 4-minute AI animated story and music video. The creator used AI to generate backgrounds, characters, and visual assets, then animated those assets into a complete story.
The workflow included:
- Midjourney for backgrounds, characters, and assets.
- Pika Scenes for animation.
- Topaz for upscaling and frame enhancement.
The production data was revealing:
| Production Detail | Data |
|---|---|
| Final video length | 4 minutes |
| Experimentation volume | 500+ generated videos |
| Estimated cost | $1,000+ |
This case is important because it breaks the myth that AI video is always cheap and instant.
AI reduced the need for traditional animation production, but the creator still had to test hundreds of outputs. A 4-minute AI video can require an enormous amount of trial and error, especially when the goal is visual continuity and story flow.
The key insight: AI lowers the barrier to animation, but long-form quality still requires planning, money, testing, and editing.
Case Study 3: Reimagining Old WWE Footage With Kling
Another practical workflow involved using old WWE match footage as a source of reference frames, then reimagining those visuals into surreal but coherent AI-generated clips.
The tool comparison included:
- Kling AI.
- Runway Gen 3.
- Minimax.
The creator found that Kling produced the most coherent result for this particular use case. The project also included an important production detail: about one-third of the final material came from original footage references.
This is a strong example of how found footage, old clips, or reference frames can guide AI video generation.
The workflow looked like this:
Original footage
→ Export reference frames
→ Feed reference images into AI video tool
→ Use simple action prompts
→ Generate surreal variations
→ Select the most coherent clips
→ Edit into final sequence
The key insight: for remix, parody, entertainment, and surreal video, reference frames can be more valuable than long text prompts. The model performs better when it has visual structure to follow.
Case Study 4: A Multi-Tool Pipeline for 4–10 Second AI Clips
A common production pattern is the multi-tool AI video pipeline. Instead of choosing one tool, creators use different tools for different jobs.
A typical workflow may include:
- Kling for realistic image-to-video clips.
- Runway for creative shots or lip sync.
- Luma for extending clips.
- Suno for music.
- ChatGPT for scripts, scene planning, and prompt drafts.
- A video editor for final assembly.
The clips are usually short, often around 4–10 seconds. Each 5-second clip may need several generations before the final version is usable.
This workflow is especially common for:
- Music videos.
- Concept films.
- Social media experiments.
- AI art videos.
- Narrative shorts.
- Viral visual content.
The key insight: realistic AI video creation is becoming a cross-model workflow. One tool may be best for motion, another for extension, another for music, another for scripting, and another for final polish.
Case Study 5: A Veo 3 Demo Limited by Credits
The Veo 3 demo case is one of the clearest examples of the credit problem in AI video production.
The creator had:
| Credit Detail | Data |
|---|---|
| Available credits | 1,000 |
| Cost per generation | 100 credits |
| Theoretical generations | About 10 |
| Actual generations used | About 20 across two education accounts |
| Final usable clips | 5 |
| Clips that worked first try | 2 |
| Clips requiring retries | 3 clips, each needing 3–6 generations |
This case shows that credits can shape the creative process. If every generation is expensive, creators may stop experimenting before they find the best version.
The key insight: the best AI video model is not always the most practical model. A tool may have excellent quality, but if the cost per attempt is high, it may be difficult to use for frequent production.
Case Study 6: 1,000 AI Videos and 10k Followers
A growth-focused AI video experiment showed another important lesson. The creator produced around 1,000 AI videos and grew to about 10k followers.
The most useful takeaway was not that more videos automatically create growth. The deeper lesson was that visual realism is only one part of the system.
For audience growth, realistic AI videos still need:
- Strong ideas.
- Clear hooks.
- Repeatable formats.
- Consistent posting.
- Good pacing.
- Niche positioning.
- Watchable scripts.
- Fast editing.
- Recognizable style.
The key insight: realistic visuals may earn attention, but story and structure keep attention.
What Is the Best Tool for Making Realistic AI Videos?
The best tool for making realistic AI videos depends on the use case. There is no universal winner. The right choice depends on whether you need cinematic realism, character consistency, product accuracy, lip sync, clip extension, low cost, or advanced control.
Best for Cinematic Realism: Kling or Veo
Kling and Veo are strong choices when cinematic realism is the goal.
Kling is practical for short, coherent, reference-based realistic clips. It is useful when you want a strong balance between visual realism and accessible production.
Veo can produce high-quality results, but credit limits can make experimentation expensive. It may be best for selected hero shots, demo clips, or high-value scenes rather than large-scale daily production.
Best for Creative Control: Runway
Runway is useful when the goal is creative direction, visual experimentation, lip sync, or mixed-media video. It is often a good fit for music videos, campaign concepts, and experimental AI filmmaking.
It may not always be the strongest option for every type of realistic physical motion, so it is often best used as part of a broader workflow.
Best for Clip Extension: Luma
Luma is useful when you want to extend a clip, build transitions, or connect visual sequences. It is often best as a supporting tool rather than the only tool in the workflow.
Best for Reference Image Creation: Midjourney
Midjourney is one of the most useful tools before video generation begins. It helps create strong visual references, characters, mood boards, and scene concepts.
If the reference image is strong, the video generation step has a better foundation.
Best for Final Polish: Topaz
Topaz is useful for improving final video quality through upscaling and enhancement. It is best used after you already have a clean clip.
It should not be treated as a way to fix bad motion or broken anatomy.
Best for Advanced Identity Control: ComfyUI and Local Workflows
ComfyUI, Wan-related workflows, and local models are best for creators who need more control and are willing to handle technical setup.
They are powerful for:
- Local generation.
- Multi-reference workflows.
- Character consistency.
- Cost control over many generations.
- Advanced customization.
But they are not the easiest option for beginners.
Text-to-Video vs Image-to-Video: Which One Makes More Realistic Results?
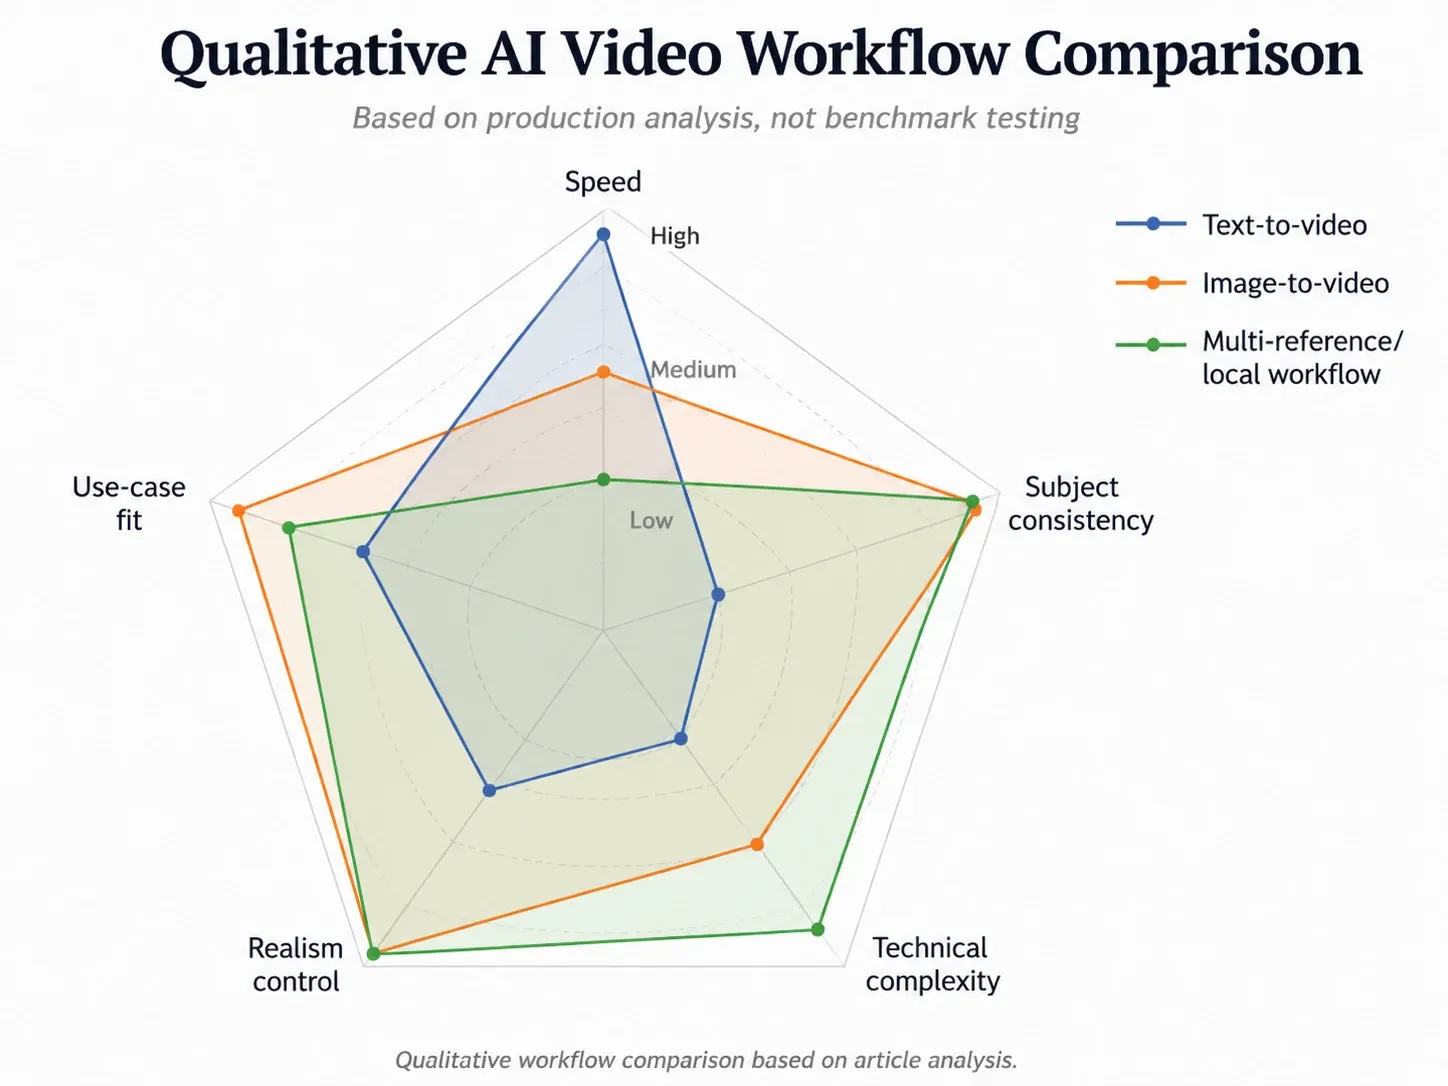
Image-to-video usually produces more realistic and controllable results than text-to-video when the subject needs to stay consistent. Text-to-video is better for fast idea generation, while image-to-video is better for realistic people, products, animals, scenes, and branded assets.
Use Text-to-Video for Fast Ideas
Text-to-video is useful when speed matters more than precision.
Use it for:
- Concept testing.
- Surreal scenes.
- Abstract visuals.
- Fantasy shots.
- Background ideas.
- Quick creative exploration.
The weakness is control. If you need the same person, product, or location to remain stable, text-to-video can become unpredictable.
Use Image-to-Video for Realistic People, Products, and Scenes
Image-to-video is better when realism depends on visual consistency.
Use it for:
- Realistic AI people.
- Product ads.
- UGC-style content.
- AI avatar clips.
- Animal videos.
- Food videos.
- Fashion shots.
- Interior scenes.
- Brand videos.
A reference image gives the model a clear anchor. It does not guarantee perfection, but it reduces randomness.
Use Multi-Reference or Local Workflows for Character Consistency
If you need a recurring character across multiple scenes, use a stronger workflow.
This may include:
- Multiple reference images.
- Character sheets.
- Consistent seed workflows.
- ComfyUI pipelines.
- Local models.
- Image-to-video plus editing.
- Face or identity control tools.
This approach is more complex, but it is often necessary for AI short films, story series, brand mascots, and digital humans.
How Much Does It Cost to Make Realistic AI Videos?
The cost of making realistic AI videos depends less on the final video length and more on how many generations you need before getting usable clips. The hidden cost is re-generation.
A single AI video clip may be cheap. A clean, realistic, publishable clip may not be.
The Hidden Cost Is Re-Generation
If one generation creates a perfect clip, the cost is low. But realistic AI video rarely works that way.
You may need multiple attempts because of:
- Face distortion.
- Weak motion.
- Broken hands.
- Bad camera movement.
- Lighting mismatch.
- Product shape errors.
- Low-energy output.
- Strange background changes.
For example, in the Veo 3 demo case, 5 final clips required around 20 generation attempts. That means the average usable clip required about 4 attempts.
This is why credit pricing matters. A tool with better output quality can still become expensive if failed attempts are costly.
Free Tools Can Work, But They Cost Time
The local AI short film case showed that a realistic AI video project can be made with $0 direct tool cost, excluding electricity and GPU cost.
But the time cost was high:
- About 1 week of work.
- Some days longer than 12 hours.
- 64+ input images.
- 36+ dialogue lines.
- 3 characters.
- Multiple tools and models.
Free tools can be powerful, but they are not always simple.
Paid Tools Save Time, But Credits Limit Creativity
Paid tools can reduce technical friction. They are easier to start with, faster to test, and more accessible for non-technical creators.
But they often introduce limits:
- Monthly credits.
- Generation caps.
- Queue times.
- Higher cost for premium models.
- Limited retries.
- Restrictions on resolution or duration.
If your workflow requires heavy experimentation, credits can become the bottleneck.
A Practical Budget Framework
| Video Type | Main Cost Driver | Main Challenge |
|---|---|---|
| 5–10 second social clip | Re-generation | Clean motion |
| 30 second ad | Credits plus editing | Product and character consistency |
| 1–2 minute story video | Many clips, voice, editing | Continuity |
| 4 minute AI animation | Hundreds of experiments | Time and cost |
| Local AI short film | GPU, setup, time | Technical workflow |
| AI avatar video | Voice, lip sync, face stability | Natural delivery |
The best budget strategy is to test short clips first. Do not plan a long video until you know how many attempts your tool usually needs for your specific style.
Common Mistakes Beginners Make When Creating Realistic AI Videos
Most beginner mistakes come from expecting the model to do too much at once. Realistic AI video production works better when you reduce complexity, control the input, and build the final video through editing.
Expecting One Prompt to Create a Finished Video
The biggest mistake is believing there is one perfect prompt that will generate a finished realistic video.
A prompt can guide the model, but it cannot replace:
- Scene planning.
- Reference images.
- Multiple generations.
- Clip selection.
- Editing.
- Sound design.
- Color grading.
- Final polish.
A better mindset is to treat prompting as one part of the production system.
Making the Scene Too Complex
Complex scenes fail more often.
Avoid putting too much into one clip:
- Too many people.
- Too many actions.
- Too much camera movement.
- Too many objects.
- Too many lighting changes.
- Too much story in one shot.
If a scene is important, split it into smaller shots.
Using Long Prompts Without Clear Motion Direction
A long prompt is not always a good prompt. Some long prompts describe style but fail to describe motion clearly.
For AI video, motion is the core.
A good prompt should clearly define:
- Subject.
- Action.
- Camera movement.
- Environment.
- Mood.
- What should remain consistent.
Avoid vague phrases like “make it cinematic” without explaining what happens in the scene.
Ignoring Editing and Sound
Many AI videos look unfinished because they stop at generation. But generation is not the final step.
Without editing and sound, a video often feels like a raw demo.
Add:
- Cuts.
- Pacing.
- Music.
- Sound effects.
- Subtitles.
- Voice.
- Color correction.
- Final export polish.
Chasing Tools Instead of Building a Repeatable Workflow
AI video tools change quickly. New models appear, old tools improve, and pricing changes.
If you only chase the newest tool, your results may remain inconsistent. If you build a repeatable workflow, you can swap tools as needed.
The strongest creators are not only better at prompting. They are better at systems.
How to Make Realistic AI Videos for Different Use Cases
Different use cases require different realistic AI video workflows. A TikTok video, product ad, short film, AI avatar, and educational video should not be made the same way.
For TikTok and Instagram AI Videos
For short-form social platforms, realism matters, but the hook matters more.
Best practices:
- Start with a strong visual in the first second.
- Keep clips short.
- Use subtitles.
- Add music or sound effects.
- Cut quickly.
- Avoid lingering on faces or hands too long.
- Build repeatable formats.
- Focus on one idea per video.
Social AI videos do not need to be perfect. They need to be watchable, clear, and interesting.
For AI Ads and Product Videos
For product videos, consistency is more important than visual spectacle.
The product should not change shape. The logo should not distort. The usage scene should be clear. The viewer should understand what the product is and why it matters.
Best practices:
- Use clean product reference images.
- Avoid overly complex product motion.
- Use close-ups.
- Show the product in context.
- Keep lighting consistent.
- Use text overlays to explain benefits.
- Do not rely only on cinematic visuals.
A realistic product video fails if the product looks different from shot to shot.
For AI Short Films
AI short films need more than good visuals. They need story structure.
Best practices:
- Write a script first.
- Break the story into scenes.
- Create reference images for each scene.
- Keep shots short.
- Use recurring visual rules.
- Add dialogue carefully.
- Use music and sound design.
- Edit for emotion, not just aesthetics.
The local AI short film case is a good example. It required 64+ unique input images, 36+ dialogue lines, 3 characters, and about 1 week of work. That is closer to real production than casual prompting.
For AI Avatars and Talking Head Videos
AI avatar videos depend on face stability, voice quality, lip sync, and natural delivery.
Best practices:
- Use a clean face reference.
- Keep lighting soft and stable.
- Avoid extreme head turns.
- Use natural voice pacing.
- Add subtitles.
- Keep background simple.
- Test lip sync carefully.
- Avoid overly long monologues without cuts.
For talking head videos, the viewer focuses on the face. Small errors become obvious.
For Training and Educational Videos
Educational AI videos do not always need cinematic realism. They need clarity, consistency, and easy updates.
Best practices:
- Use clear narration.
- Use slides, diagrams, or screen visuals.
- Keep the avatar stable.
- Avoid unnecessary cinematic effects.
- Break lessons into short modules.
- Add captions.
- Make the video easy to revise later.
For training content, the goal is not to impress viewers with AI. The goal is to help them understand and remember the material.
Realistic AI Video Checklist Before You Publish
Before publishing a realistic AI video, review it like a producer, not just a prompt writer. A clip may look impressive on the first watch but reveal problems when you inspect it closely.
Visual Quality Checklist
Ask:
- Is the face stable?
- Do the hands look acceptable?
- Does the body move naturally?
- Does the subject keep the same identity?
- Does the product keep the same shape?
- Is the lighting consistent?
- Is the background stable?
- Are there visible glitches?
- Does the camera movement feel intentional?
- Are the first and last frames clean?
If a clip fails several of these checks, regenerate or cut it.
Story and Editing Checklist
Ask:
- Does the first 2 seconds create interest?
- Does each clip serve a purpose?
- Is the pacing too slow?
- Are weak frames removed?
- Do transitions feel natural?
- Is the sequence easy to follow?
- Does the video have a clear beginning, middle, and end?
- Is the idea stronger than the visual effect?
A realistic video with no structure still feels like a demo.
Audio and Final Polish Checklist
Ask:
- Is the voice clear?
- Does the music match the scene?
- Are sound effects believable?
- Are subtitles readable?
- Is the color grade consistent?
- Is the export quality high enough?
- Does the video feel like one finished piece?
- Would someone watch it without caring that it was made with AI?
That last question is the real test. The best realistic AI videos do not make viewers think about the tool. They make viewers focus on the scene, story, product, or message.
FAQ: Real Questions About Making Realistic AI Videos
How are people making realistic AI videos?
People are making realistic AI videos by combining reference images, image-to-video tools, short clip generation, repeated re-generation, editing, sound design, upscaling, and color grading. Most realistic AI videos are not made with one prompt. They are assembled from multiple clean clips.
What tools are people using to make realistic AI videos?
Common tools include Kling, Runway, Luma, Veo, Midjourney, Topaz, ComfyUI, Wan-related workflows, local video models, voice tools, music tools, and editing software. The best tool depends on the use case.
Are realistic AI videos made with Sora, Kling, Runway, or a full workflow?
Most realistic AI videos are made with a full workflow. A tool like Kling, Runway, Veo, or Sora may generate the clips, but the final result usually also depends on reference images, re-generation, editing, audio, upscaling, and color grading.
Is text-to-video or image-to-video better for realistic AI videos?
Image-to-video is usually better for realistic results when you need a consistent person, product, animal, or scene. Text-to-video is better for fast ideas and creative exploration.
How do creators keep the same character in AI videos?
They usually use reference images, short clips, consistent prompts, multi-reference workflows, character sheets, image-to-video tools, and careful editing. For advanced control, some creators use ComfyUI or local workflows.
Why do my AI videos have random glitches even when my prompt is detailed?
A detailed prompt does not guarantee physical consistency. Glitches often happen because the scene is too complex, the action is unclear, the clip is too long, the reference image is weak, or the model cannot maintain identity and motion across frames.
What is the best AI video generator for realistic videos?
There is no single best AI video generator for every project. Kling is strong for coherent realistic short clips. Veo can produce high-quality outputs but may be limited by credits. Runway is useful for creative control and lip sync. Luma is useful for extending clips. Local workflows offer advanced control.
How do I stop faces from warping in AI videos?
Use clean reference images, keep clips short, avoid extreme head movement, generate multiple versions, use image-to-video instead of pure text-to-video, and remove weak frames during editing.
How do I reduce broken hands and body distortions?
Use simpler actions, avoid complex full-body scenes, keep hands away from the center of attention, split complex movement into multiple shots, and select the cleanest generated clips.
Can free or low-cost tools make realistic AI videos?
Yes, but they usually require more time and technical skill. One local AI short film case in my research had $0 direct tool cost, excluding electricity and GPU cost, but required about 1 week of work, 64+ input images, 36+ dialogue lines, and long production days.
Why do AI videos often look like slow motion?
AI models sometimes choose slow or minimal movement because it is safer than complex physical action. To improve this, use clear action verbs, simple motion, better references, and tools that handle movement well.
How do people make long AI videos if models only generate short clips?
They make long AI videos by generating many short clips, selecting the best outputs, stitching them together, adding transitions, matching color, adding audio, and editing the sequence into a complete story.
How much does it cost to make a realistic AI video?
The cost depends on how many generations you need. A short clip may be cheap, but a clean realistic clip may require multiple attempts. A 4-minute AI animated story in my research required 500+ generated video experiments and cost over $1,000.
How do I make AI videos look less fake?
Use reference images, keep clips short, generate multiple versions, select clean outputs, edit out weak frames, add realistic sound, use subtitles, color grade the final video, and apply subtle film grain or upscaling when needed.
Can AI videos be used for product ads?
Yes, but product consistency is critical. Use clear product reference images, avoid complex transformations, keep the product shape stable, and use editing to combine close-ups, lifestyle shots, and benefit-driven text overlays.
Final Takeaway: Realistic AI Videos Are Made With Workflows, Not Magic Prompts
Realistic AI videos are not made by typing one perfect prompt into one perfect tool. They are made through a workflow that combines planning, reference images, short clip generation, repeated selection, editing, audio, upscaling, and final polish.
The creators getting the best results are not only better at prompting. They are better at building production systems.
As AI video tools improve, the advantage will move from “who has access to the best model” to “who has the best workflow, story, and editing process.” A realistic AI video is not just a generated clip. It is a finished piece of media.