
How to Export Video from PPT: 2026 Step-by-Step Guide

To export video from PPT, open the presentation in the desktop PowerPoint app, then select File > Export > Create a Video on Windows or File > Export on Mac.
Choose MP4 or MOV, select the video quality, include recorded timings and narration if needed, and export the file. PowerPoint for the web may not offer the same video export options.
However, exporting a PPT still leaves you managing scripts, narration, visuals, and localization manually. That slows production and makes updates costly.
Leadde turns PowerPoint files and documents into professional business videos in minutes, helping teams cut production costs by up to 80% and content creation time by up to 90%.

How to Export Video from PPT: Complete 2026 Guide for Windows, Mac, Audio, and Embedded Media
How to Export Video from PPT on Windows and Mac
PowerPoint’s desktop applications can turn a finished presentation into a standard video file. The exact menu path, output formats, and media behavior depend on whether you use Windows or macOS.
Before exporting, save a separate copy of the original PPTX. The exported video is a flattened file, so viewers cannot edit slides, click most interactive buttons, or change the original timing.
Export a PowerPoint as MP4 on Windows
On Windows, use the following process:
- Open the presentation and select File > Export.
- Select Create a Video.
- Choose the video quality.
- Select whether to use recorded timings and narrations.
- Set a default duration for slides without recorded timing.
- Select Create Video.
- Save the file as MPEG-4 Video (.mp4) or Windows Media Video (.wmv).
PowerPoint can export in Ultra HD 4K, Full HD 1080p, HD 720p, or Standard 480p. Microsoft recommends MP4 for broad media-player compatibility, while 1080p is usually the most practical balance between quality and file size.
A progress indicator appears at the bottom of the PowerPoint window. Do not close PowerPoint or shut down the computer until the export is complete.
Export a PowerPoint as MP4 or MOV on Mac
On Mac, select File > Export rather than Save As. Open the File Format menu, choose MP4 or MOV, select the quality, and enable Use Recorded Timings and Narrations when required.
If a slide has no recorded timing, enter the number of seconds it should remain on screen. Then select Export and review the completed video.
Mac exports require extra testing. Microsoft states that recorded narration can play in the exported video, but other embedded media may not play. Some transitions can also look different, and animation effects may not appear in the exported movie.
| Feature / OS | Windows PowerPoint | Mac PowerPoint |
| Export Menu Path | File > Export > Create a Video | File > Export |
| Supported Formats | MP4, WMV | MP4, MOV |
| Media Preservation | High (animations, embedded media mostly play) | Limited (embedded media/animations may fail) |
| Default Recommendation | 1080p MP4 | MP4 |
Which PowerPoint Versions Support Video Export?
Video export is available in several desktop editions, including supported Microsoft 365 and recent standalone PowerPoint versions. However, menu names and available resolutions vary by platform, version, license, and operating system.
If Create a Video, MP4, or MOV is missing:
- Confirm that you are using the desktop application.
- Update PowerPoint.
- Convert an older
.pptfile to.pptx. - Check whether your license supports the required Mac export feature.
- Download files opened in PowerPoint for the web and export them through the desktop app.
Older tutorials may show Slide Show > Record Slide Show, while newer Microsoft 365 versions also provide a dedicated Record workspace.
How to Export PowerPoint With Audio, Animations, and the Right Video Settings
A video export is only as complete as the material recorded in the presentation. Narration, timing, animations, and media should therefore be tested before rendering the final MP4.
Record Narration, Webcam Video, and Slide Timings
Open the slide where recording should begin and select Record. PowerPoint can capture:
- Voice narration
- Slide timings
- Animation timings
- Webcam video
- Ink and highlighting
- Laser-pointer movements
PowerPoint records the time spent on each slide and the timing of animation steps or triggers. You can also re-record an individual slide without starting the entire presentation again.
Avoid speaking while moving between slides. Microsoft notes that audio and video are not recorded during transitions, and a short silent buffer is added at the beginning and end of each slide. Pause briefly, change the slide, and then continue speaking.
Preview the full slide show before export. Check that the microphone volume is consistent, the webcam frame is correct, and every animation appears at the intended moment.
Choose Between 4K, 1080p, 720p, MP4, MOV, and WMV
Select the resolution according to the final viewing environment rather than choosing the highest setting automatically.
| Setting | Best suited to |
| 4K | Large displays, detailed diagrams, high-resolution archives |
| 1080p | YouTube, training, product education, and general business use |
| 720p | Smaller files, internal sharing, and slower connections |
| 480p | Basic previews or strict file-size limits |
Higher resolution produces a larger file and can increase rendering and upload time. Exporting a low-resolution source presentation in 4K will not restore detail that was missing from the original images.
Use MP4 for the widest practical compatibility. Microsoft recommends MP4 files encoded with H.264 video and AAC audio when inserting and playing media in PowerPoint.
MOV is available on supported Mac versions and may suit Apple-based workflows. WMV remains an option on Windows, but MP4 is normally easier to distribute across devices and web platforms.
Which Animations, Transitions, and Embedded Media Are Preserved?
Windows PowerPoint can include recorded timings, narration, animations, transitions, compatible media, ink, and laser-pointer movements in the video. However, linked media may be dropped during export.
Mac behavior is more limited. Microsoft warns that animation effects may not play in exported movies and that embedded media other than recorded narration may fail to play.
Always create a short test export when the deck uses:
- Triggered animations
- Morph or complex transitions
- Embedded video
- Background music
- Online video
- Old QuickTime files
- OLE or ActiveX objects
Interactive features such as hyperlinks, branching buttons, quizzes, and click-based navigation are generally flattened or lost in a normal MP4. Keep the PPTX when viewers still need interaction.
| Setting | Best suited to |
| 4K | Large displays, detailed diagrams, high-resolution archives |
| 1080p | YouTube, training, product education, and general business use |
| 720p | Smaller files, internal sharing, and slower connections |
| 480p | Basic previews or strict file-size limits |
How to Extract or Move Videos Embedded in a PowerPoint
“Export video from PPT” can describe two different tasks. Exporting creates a video of the full presentation, while extracting retrieves an original media file already stored inside the PPTX.
Use Save Media As or Extract Files From the ppt/media Folder
The simplest extraction method is:
- Right-click or Control-click the video.
- Select Save Media As.
- Choose a file name and location.
- Save the original media file.
Microsoft documents Save Media As as the standard way to reuse an embedded audio or video file outside the presentation.
If that option is unavailable on Windows, make a copy of the PPTX and use the package method:
- Display file-name extensions.
- Change the copied file from
.pptxto.zip. - Open the ZIP package.
- Open the
pptfolder. - Open the
mediafolder. - Copy the required file to another location.
Microsoft confirms that this method can extract videos, pictures, sounds, and other objects. Its official procedure works on Windows, not macOS.
Do not create a new ZIP containing the PPTX. You must change the extension of a copied PPTX so that its internal package becomes accessible.
Embedded, Linked, and Online Videos: What Is the Difference?
An embedded video is stored inside the PowerPoint file. It increases the PPTX file size but is easier to move with the presentation.
A linked video remains outside the presentation. PowerPoint stores its file path, so the link can break after the PPTX or video is moved. Microsoft recommends putting the linked video and presentation in the same folder before creating the link.
An online video remains hosted by a service such as YouTube or Vimeo. It normally requires internet access and continued availability of the original online content. Not every online video permits embedding.
Use File > Info > Optimize Media Compatibility to inspect and improve media compatibility. PowerPoint can also show whether media files are linked or embedded.
| Video Type | Storage Location | Key Advantage | Key Disadvantage |
| Embedded | Inside the PPTX file | Moves easily with the presentation | Increases overall file size significantly |
| Linked | External folder/drive | Keeps PPTX file size small | Links easily break if files are moved |
| Online | External host (YouTube/Vimeo) | Saves local space, easy to update source | Requires internet, may block embedding |
Save a PowerPoint With Videos for Another Computer
For an embedded H.264/AAC MP4, moving the PPTX may be enough. However, you should still test the deck on the destination computer before a meeting, class, or event.
For linked media, keep the PPTX, videos, audio, and required fonts together. On supported versions, use:
File > Export > Package Presentation for CD > Package for CD
Despite its name, the package can be saved to a folder or USB drive. Microsoft states that packaging transfers external elements such as linked files and fonts with the presentation.
For an important presentation, carry two versions:
- The complete PPTX package for interactive delivery
- An exported MP4 as a playback backup
Copy the files to the destination computer before presenting. Playing a large deck directly from a slow USB drive can increase the risk of delays.
Why Does PowerPoint Video Export Fail?
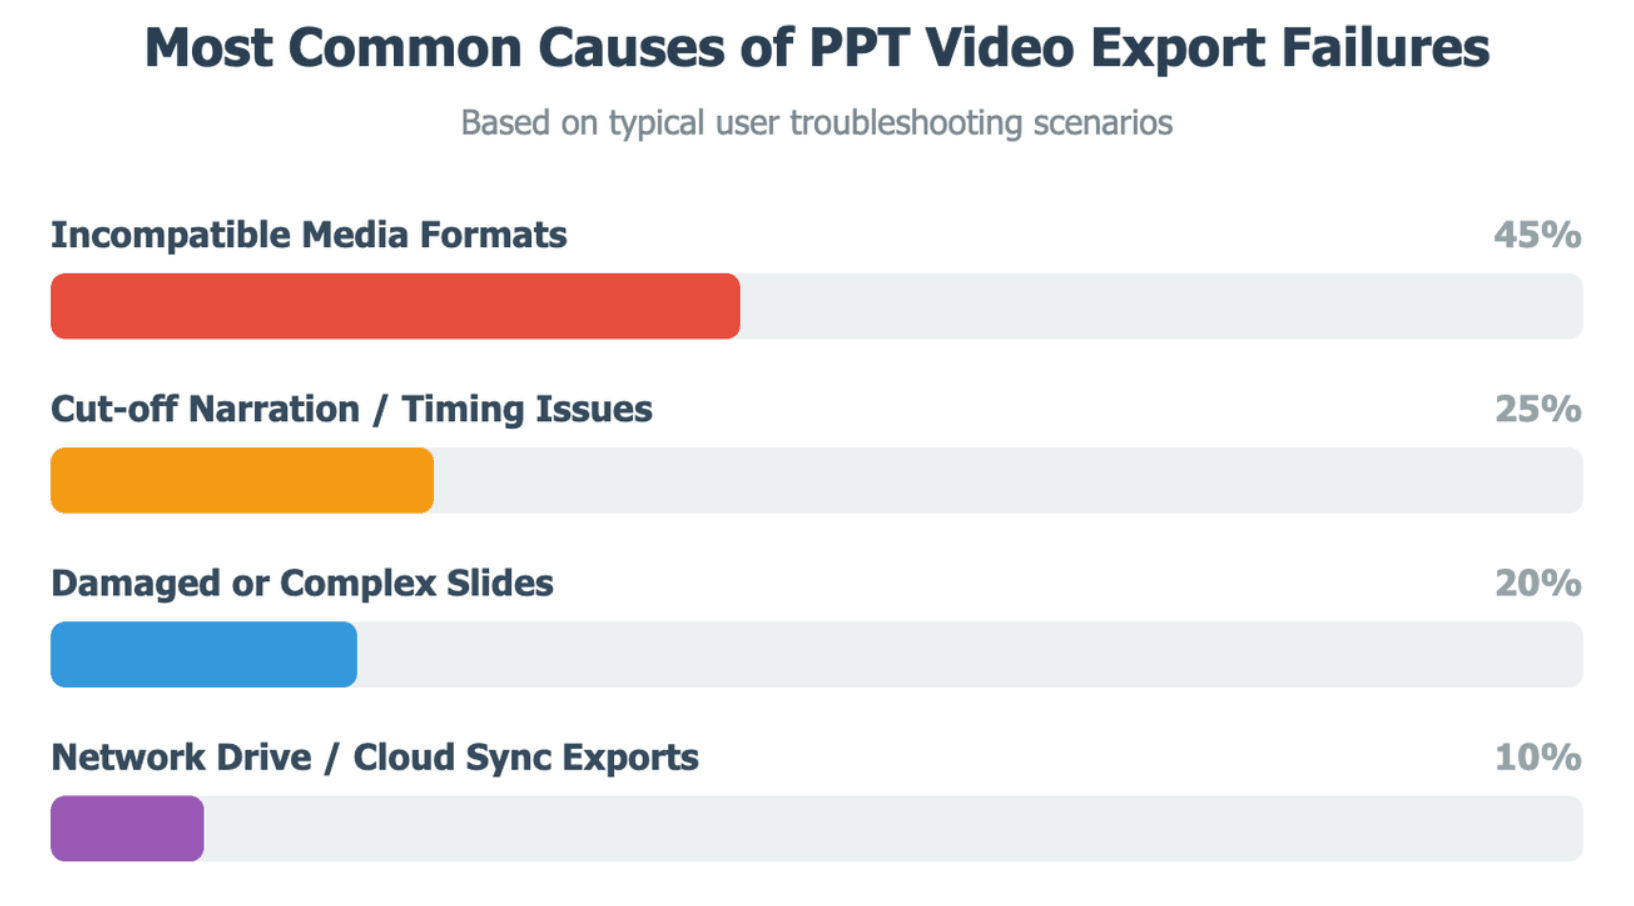
Export problems often come from narration timing, incompatible media, linked files, or a single damaged slide. Test the presentation in small sections rather than repeatedly exporting the full deck without diagnosis.
Fix Missing Audio, Cut-Off Narration, and Incorrect Slide Timings
If the exported video has no sound, first confirm that Use Recorded Timings and Narrations was selected during export.
Then check:
- Whether narration exists on every required slide
- Whether Play Narrations is enabled
- Whether the audio is embedded or linked
- Whether the media format is supported
- Whether the slide advances before the narration finishes
Do not speak during a slide transition. PowerPoint does not record narration during the transition itself, and short buffers can make words at the beginning or end of a slide appear cut off.
A practical recording habit is to pause briefly before advancing and pause again before starting the next sentence. Preview the first and last seconds of every slide with narration.
If background music restarts unexpectedly, inspect its playback setting. PowerPoint can use Play in Background to start audio automatically and continue it across multiple slides.
Fix Frozen Embedded Videos, Missing Animations, and Blurry Output
A frozen thumbnail usually means PowerPoint displayed the video poster frame but did not render the moving media. This is especially important on Mac, where Microsoft warns that embedded media other than recorded narration may not play in the exported movie.
Try the following fixes:
- Replace the media with an H.264/AAC MP4.
- Set the video to start automatically.
- Remove click-only triggers.
- Run Optimize Media Compatibility.
- Reinsert the video on a clean slide.
- Export a test containing only that slide.
When the goal is to recover the original video, use Save Media As or extract it from ppt/media instead of exporting the slide.
For blurry output, check the source materials. Use high-resolution images, enlarge small text, select the correct slide aspect ratio, and export at 1080p or higher when the content contains detailed diagrams.
Troubleshoot Slow, Stuck, or Incomplete Video Exports
Large presentations with long narration, high-resolution media, or complex animations take longer to render. PowerPoint shows export progress at the bottom of the application window.
When the export repeatedly stops:
- Save a duplicate of the presentation.
- Export only the first half.
- Export only the second half.
- Continue dividing the failing section.
- Identify the exact slide causing the issue.
- Reinsert or re-encode its media.
- Export the repaired section again.
This half-deck testing method is faster than deleting slides randomly.
Export to the computer’s local drive first rather than directly to a USB drive, cloud-synced folder, or network location. You can also use Compress Media, but Microsoft warns that compression may remove embedded captions and alternate audio tracks.
For very long presentations, splitting the deck into shorter chapters can make rendering, review, uploading, and future updates easier.
Should You Use PowerPoint Export, Screen Recording, or an AI Video Tool?
The best method depends on whether you need slide fidelity, live interaction, advanced editing, or scalable content production.
| Method | Best use |
| Native PowerPoint export | Finished presentations with recorded narration and timings |
| Screen recording | Live demonstrations, software walkthroughs, and flexible camera commentary |
| Traditional video editor | Precise cutting, color, sound, and motion control |
| AI video platform | Scripts, avatars, localization, and repeated business-video production |
When Native PowerPoint Export Is the Best Choice
Use native export when the presentation is already complete and you want the final video to follow its existing structure.
It is a strong choice for:
- Narrated lectures
- Internal briefings
- Simple training presentations
- Conference submissions
- Recorded reports
- One-time educational videos
The workflow stays inside PowerPoint, and viewers can watch the resulting MP4 without having PowerPoint installed.
Native export is less suitable when the deck depends on live hyperlinks, quizzes, branching paths, unsupported media, or complex Mac animations.
When Screen Recording or a Video Editor Works Better
Screen recording is useful when you need to demonstrate live software, switch between applications, draw attention to changing interface elements, or present with real-time commentary.
PowerPoint itself includes screen-recording tools, while dedicated recording software may provide more control over camera placement, cursor effects, and editing.
A video editor is better when you need to:
- Remove mistakes and long pauses
- Mix several recordings
- Add B-roll
- Improve audio
- Replace a short section
- Add branded intros and outros
- Control captions precisely
The trade-off is more manual work. A small change to the source deck can require new recording, editing, synchronization, review, and export.
How Leadde Turns PowerPoint Files Into Scripted, Multilingual Business Videos
Leadde follows a different workflow from native PowerPoint export. Instead of simply flattening the slide show, it can analyze PowerPoint files and other business documents, then generate structured outlines, scenes, voice-over scripts, and visual layouts.
According to Leadde’s official product overview, its Slide Presenter supports layered PowerPoint import, allowing users to edit text, icons, and visual elements after import. The platform also provides AI presenters, multilingual workflows, interactive video features, version control, and analytics.
A typical workflow is:
- Upload a PowerPoint file.
- Select language, tone, audience, and detail level.
- Review the generated outline.
- Choose a template and presenter.
- Review scene-level scripts and visuals.
- Preview and generate the video.
This approach is more suitable when a business needs to turn many decks into training, onboarding, SOP, product-education, or localized videos. It may rebuild the content as a new video story rather than preserve every original PowerPoint animation.
How to Review, Publish, and Update a PowerPoint Video
Creating the MP4 is not the final quality-control step. Review the exported file as a viewer would experience it, then keep the source materials organized for future changes.
Use a Pre-Export and Post-Export Quality Checklist
Before export, confirm:
- Slides are in the correct order.
- Narration is present and clear.
- Slide timings are long enough.
- Animations appear at the correct time.
- Embedded videos play completely.
- Linked media has been replaced or packaged.
- Fonts and layouts display correctly.
- A backup PPTX has been saved.
- A short test video exports successfully.
After export, watch the complete MP4 and check:
- The opening and ending
- Every slide
- Audio volume
- Lip or camera synchronization
- The first and last words of each slide
- Embedded video playback
- Blank or frozen frames
- Text readability
- Caption timing
- Playback on another device
The OU teaching guide also recommends reviewing narration before export and checking slides, audio, timing, and embedded media in the finished video.
Add Captions and Publish to YouTube, an LMS, or an Internal Platform
Captions improve accessibility and help viewers follow technical terms, names, and numbers. PowerPoint supports caption files for recorded presentations, screen recordings, and inserted local videos, although online videos are treated differently.
Review automated captions manually. Pay particular attention to:
- Product names
- People’s names
- Acronyms
- Numbers
- Technical vocabulary
- Words spoken over music
For public education or marketing, upload the MP4 to a video platform such as YouTube. For employee training, use an LMS, enterprise video portal, or access-controlled internal platform.
Avoid uploading very large videos directly into an LMS file area when the organization has a dedicated media-hosting service. Hosting the video separately and embedding it can make playback and content updates easier.
Protect Sensitive Files and Keep the Video Easy to Update
A PowerPoint file may contain private speaker notes, hidden slides, customer information, internal charts, or embedded source media. Remove material that should not be shared before uploading the PPTX to an online converter or AI service.
Before using a third-party platform, review:
- File-retention rules
- Data-storage locations
- Access controls
- Deletion options
- AI-training policies
- Security documentation
- Team-sharing permissions
Keep an organized project folder containing:
- The approved PPTX
- Original audio and video
- Images and fonts
- Caption files
- Exported MP4s
- Review notes
- Version numbers
Use clear names such as training-video-v1-draft, v2-review, and v3-approved. When slides change later, this structure makes it easier to identify what must be updated and prevents the final approved video from being overwritten.
Conclusion
Use native PowerPoint export when the deck is finished and only needs to become an MP4. Use Save Media As or the PPTX ZIP method when the goal is to extract an original embedded video, and package linked files when the presentation must work on another computer. Screen recording and video editors provide more production control, while AI video platforms are better suited to automated scripting, presenters, localization, and repeated updates. In every case, preserve the original PPTX, test the media, and review the complete exported video before publishing.